
Improving Identity Security in M365
Note: This article is a re-cap of concepts I covered in a webinar that originally aired on September 24, 2024, which was something of a follow up to another that I conducted on M365 security back in April. Please feel free to reference either of those recordings using the links provided.
You can level up your identity management game with Microsoft Authenticator, scoring not only a strong, phishing-resistant solution, but also providing passwordless authentication for your users. If you didn't know this you're in good company. From my experience, most organizations who adopt Authenticator don't bother to change the configuration from the defaults.
In this article I dig under the hood to get to some of the advanced features and settings that you may not have been aware of. Hopefully I'll answer questions you may have had over the years, especially those who have managed M365 tenants for a while.
More specifically, I break the process of improving M365 security with Authenticator into three parts:
- Enabling enhanced Microsoft Authenticator prompts
- Removing weaker MFA registration methods like SMS, push notifications, email and one-time passwords
- Leveraging conditional access policies to put these advanced, stronger MFA methods into action
But first, some background.
Understanding "Authentication" and "Passwordless"
Authentication is, at its core, the process of proving that you are who you say you are. There are three common approaches to this:
- Provide some bit of knowledge that only you would have and which can be matched with the information stored with your profile, like a password or password phrase, or answers to security questions
- Share something that only you would have in your possession, such as a certificate, a hardware token, or device
- Allow a scan of part of your body, such as your fingerprint, your face or your eyes
Approaches 2 and 3 would be considered forms of Passwordless authentication, which you may be hearing more about, for at least a couple reasons. It's widely considered to be more secure, since it eliminates the risk of password-related attacks like phishing and brute force attacks. It can also streamline the process of authentication for users.
Let's dive in. As I mentioned above, we'll start by taking a look at some of the enhanced authenticator prompts.
Part 1: Enable Enhanced Authenticator Options
In the Azure portal (https://portal.azure.com), go to Entra ID > Manage | Security > Manage | Authentication Methods and click on "Microsoft Authenticator".

Then click on the "configure" tab.

You should now see the page with all the specific settings within your Microsoft authenticator that you can modify.
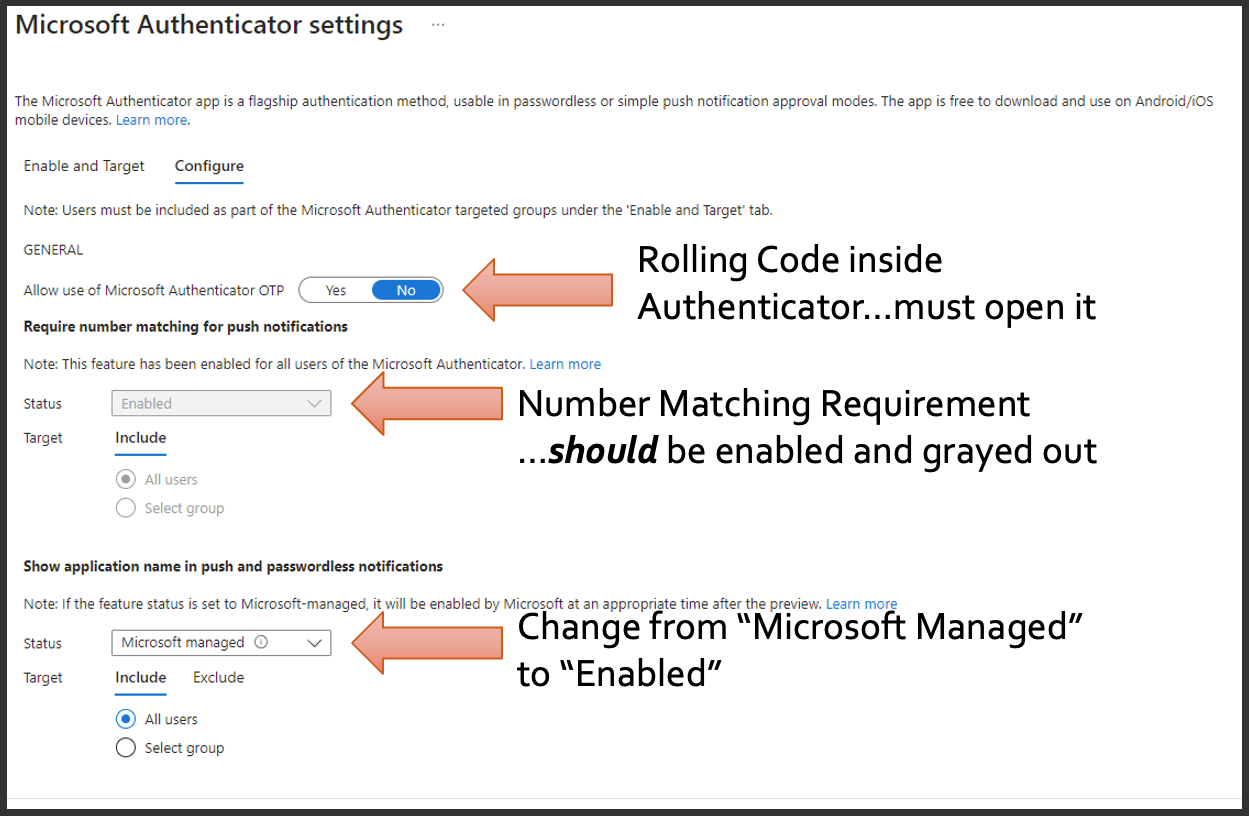
Start at the top, where you'll find the OTP setting for your Microsoft authenticator. That's the "one-time password" that serves kind of like those old RSA tokens with that rolling number numeric code. This is the one where the user would have to find that entry in their authenticator, click on it and then view that rule in code. So given that we're trying to move away from weaker forms of MFA, I would encourage turning this setting off.
Here also is the setting that shows whether or not your tenant is enforcing number matching, where the application prompts the user on their desktop, and then they have to match that number or guess that number on the authenticator app. It should be enabled and grayed out in your environment, no matter the age of your tenant. If it isn't, I would encourage you to enable to make sure that all users have this. This gets you away from that one way push notification where users just hitting a button to accept, and actually having to pay attention and get the number right.
I'd like to draw your attention to the setting that says, "Show application, name and push and passwordless notifications". The default is Microsoft managed, and what I would recommend you do is changing that to enabled, so that it always prompts the user with which application is requesting this access.

Further down the page is another setting stating whether or not to show a geographic location or a map thumbnail in that password notification. Similarly to what we did before, we would want to change that from Microsoft managed to "enable".
Here's what those prompts look like for your users, with the name of the app, and then an actual map of the origin of the request.
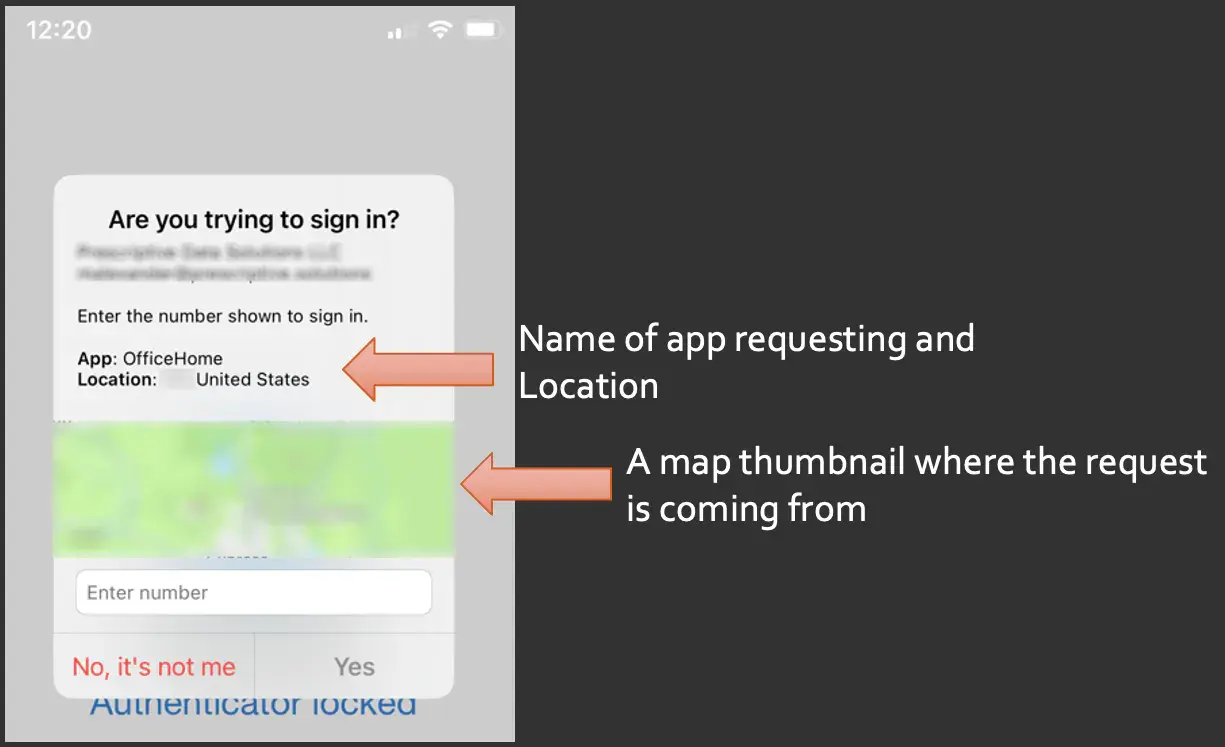
This is powerful, low-hanging fruit, and it allows your users to be able to make better decisions based on this increase of context in their hands.
So let's now transition into disabling weaker forms of registration
Part 2: Disable Weaker MFA Registration
In Entra ID under Manage | Security > Manage | Authentication Methods, we want to just take a moment and look at all of these that are currently set for your tenant, as this will be the new unified experience. You want to take time to make sure that these are the ones you want. In this example, we have FIDO2 keys enabled, Microsoft authenticator enabled with a yes, and then a temporary access pass, and then email OTP. By the end of this presentation we want to allow only the strongest registration options for SSPR, which stands for "self service, password reset", and MFA through users.
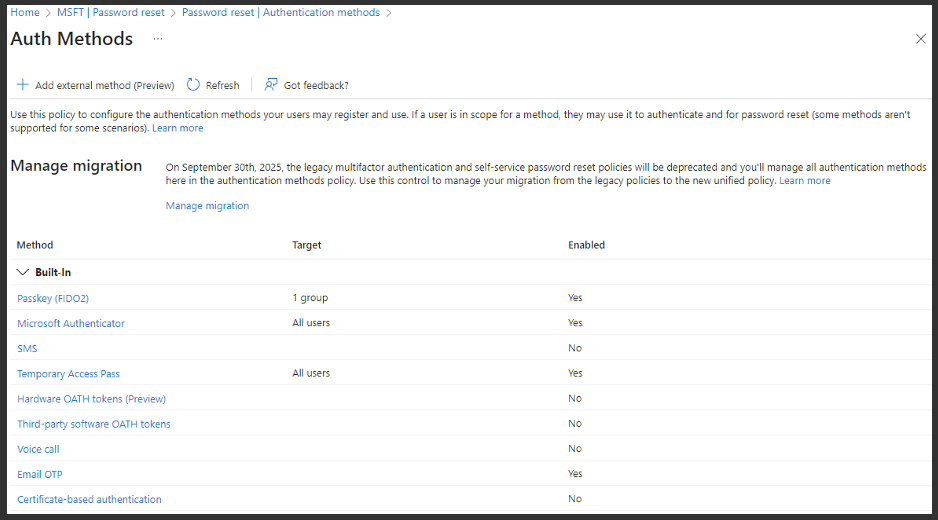
A quick warning here about two things that can stand in the way of the new unified experience some of you may have tried to transition to, where you seem to be getting some old prompts from some legacy things that you thought you turned off in that portal I just showed you. Hopefully I'm going to be able to provide some clarity and explain why some of those things have been hard to get rid of.
One obstacle blocking this new experience is what is called the legacy MFA settings. The other involves the registration options for your SSPR settings. We're going to walk through both of these areas now.
On that same page, I want to draw your attention to this section:

You may have not seen this, but Microsoft recently published this in the tenants and authentication methods, saying that they're going to be getting rid of the legacy multifactor authentication and SSPR Reset policies and actually depend on this. But you'll also notice there's a Manage migration link again. Some of these things are just hidden in plain sight, and you almost have to seek these out. If you click on that, it's going to bring up three options that you can migrate for your MFA registration. And you'll see sprinkled all over this is this notion of the legacy policies as well as SSPR.
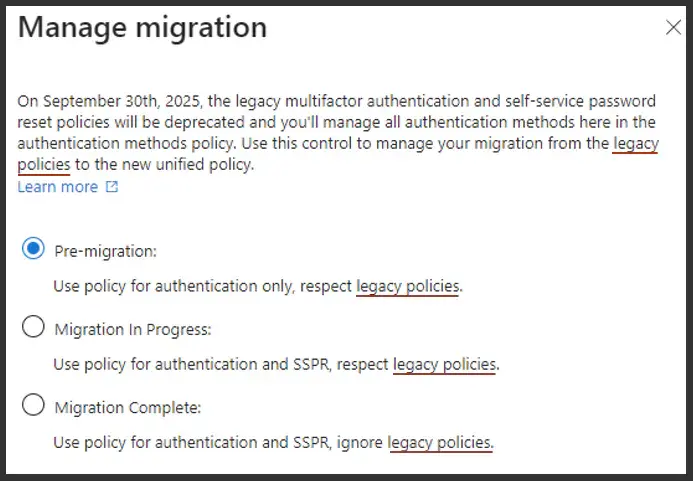
So what are the legacy policies? If you were to click on "migration complete" in this demo environment, you would get a message that you can't do this, because, again, your legacy MFA and sspr policies are getting in the way.

The legacy policies refer to that first iteration of the MFA registration and enforcement within your tenant. But how do you get to those? Well, you would go into Entra ID, we've been in the authentication methods. You would go to the users, which would bring up this screen, so you see the list of your users.
This should look familiar, but what you need to do is click on this per user MFA button at the top.

And once you do that, this should start to look very familiar. This is that old screen where you could enable, enforce and disable MFA. You know, I don't know about you all, but I kind of struggled with how this worked, and how the new conditional access policies played in, but this should make it all straightforward.
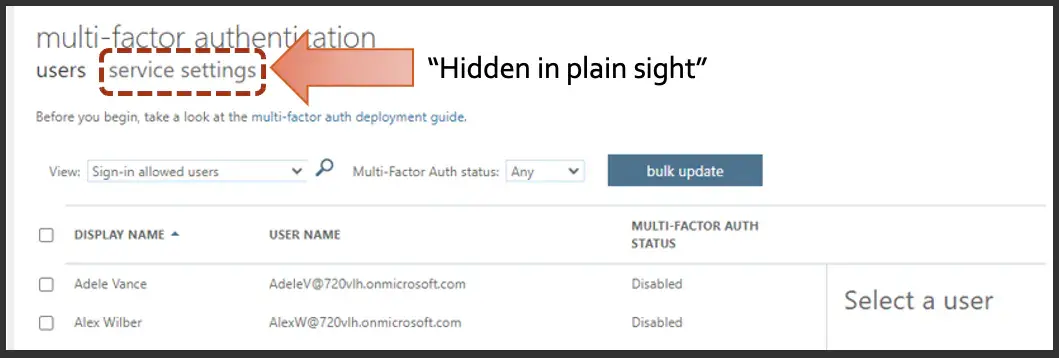
Now the key is you want to go to again, hidden into plain sight, that service settings tab, and when you go there, you'll see something like this:
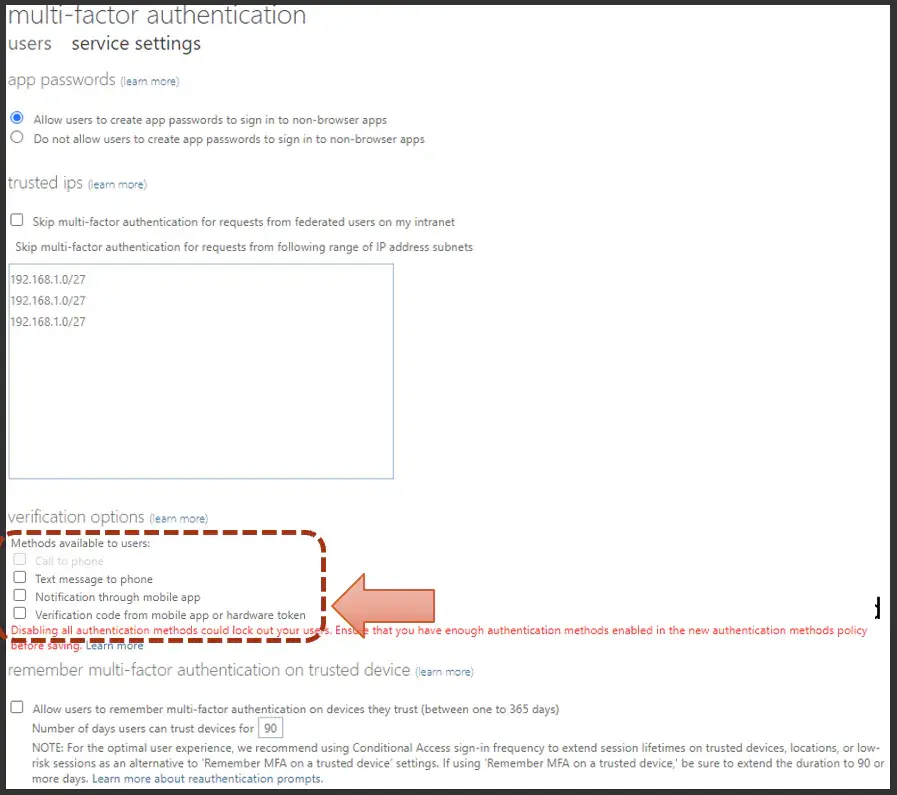
At the bottom are the legacy registration options which are probably most likely still enabled in your tenant and as part of this process?
WARNING: Do not uncheck these things until we get completely through this article, because you're going to be immediately dependent on these new unified settings. Do this only if you've done a careful review and have walked through these all of these details.
Now I'd also like to draw your attention downward, where I would like to just uncheck all MFA session keeping and memory from the legacy model. I'd recommend unchecking this piece at the bottom as well.
SSPR methods is another place that could be involved, and where you get to those is by going to Entra ID manage clicking on password reset this time, and then you'll be able to manage the authentication methods inside of password reset, which will bring up this screen:
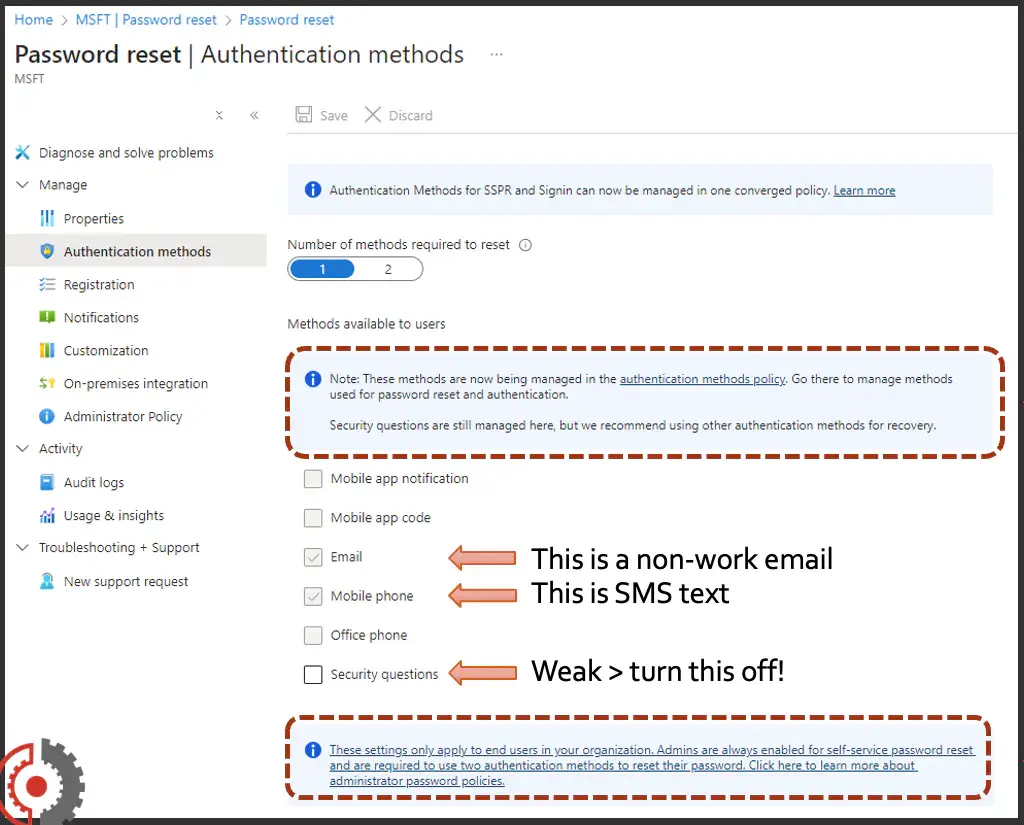
This is the third interface, the first being the "unified" screen, then we just got out of the legacy, and now we're going into the SSPR registration methods. This also tells you that there is a migration to the new unified experience, and you'll need to go in there to manage those methods. I'd like to call out why these are enabled but grayed out. For one, the checked email option is for SSPR, a non-work email. The mobile phone would be an SMS text option, not authenticator. Since we're talking about moving off of weaker forms, I would also turn off these security questions.
Some light bulbs may be going of. Why do I still get these security questions, even though I turn them off on that new page? Well, some of these old methods are creeping in, and this, if you look closely, is an explainer on why email and mobile phone up top are checked and grayed out because those are mandatory for admins to do SSPR functions.That's why we can't turn those off or alter those.
Now that we've walked through where to disable the legacy registration options as well as the SSPR settings, we can get back to that managed migration and mark it as complete. That's in the authentication methods. Then click on that manage migration button.
Once all of these things are turned off on the back end, nothing is holding you back, and you'll get a fancy green checkbox there:

Then you want to come back around and do a final review of those unified MFA registration options that I started with, which is back in the authentication method section.
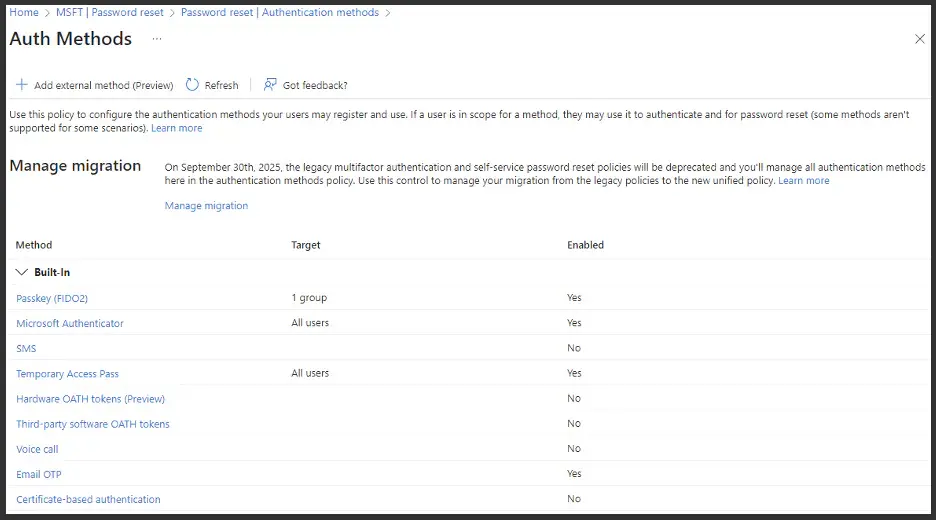
You'll need to decide which of those weaker methods you would like to disable.
I keep talking about weaker and stronger, soI'd like to give you all kind of some guidance or view on how we would rank individual MFA methods from strongest to weakest:
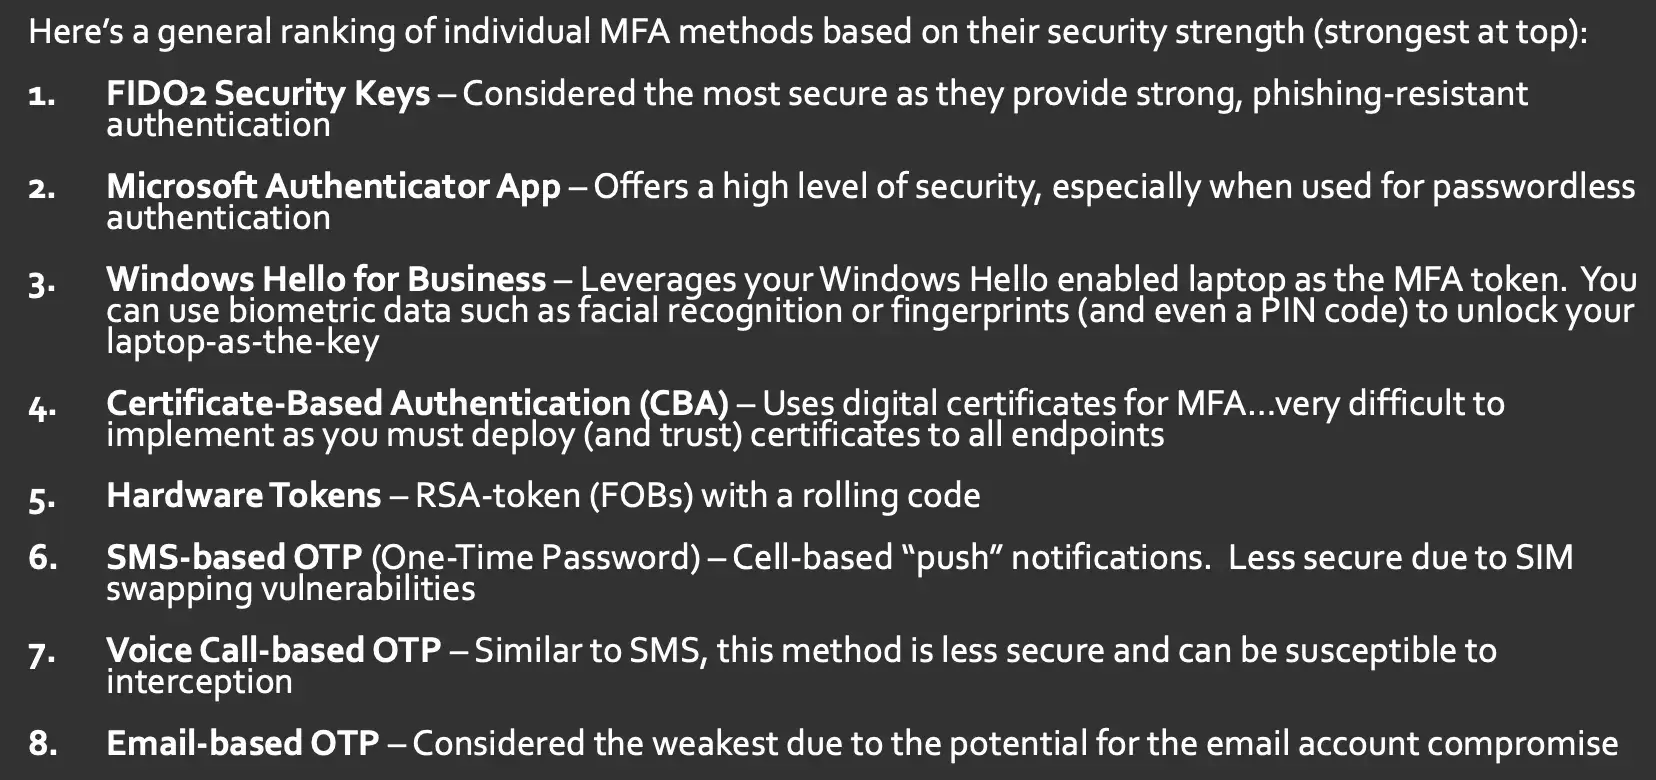
The most secure on that list would be FIDO2 security keys. It's typically just a little fob that has a little button that you can push on it. A bad actor would have to break in your house or get it out of your pocket. They have a rolling alpha numeric code in them. It's not just a four- to six-digit number it's probably 56 characters long, and then you actually have to use a pin code to unlock it. Very secure.
Number two would be the Microsoft authenticator app, especially when it's used in a passwordless authentication method, and we're going to get into that towards the end of this presentation.
Then there's Windows Hello for Business. I know some of you are thinking, well, all that's just a PIN code or just facial recognition, right? Well, I want to kind of turn your head on its ear a little bit. Windows Hello for Business is a little bigger than that. The PIN codes and the bio is only used to unlock your computer, which Windows Hello is actually using as an authentication token—almost like thet FIDO key. The pin code or bio method confirms that you have access or control of that key, which is your laptop.
Next on the list would be certificate-based authentication. This is lower because certificates can be stolen digitally. And then certificates are very difficult to renew. They expire. You have to get those deployed and trusted to every single endpoint that could possibly be dependent on MFA.
Number five would be those RSA tokens that I've talked about. When they first came out they were bleeding edge, but now I think they're almost too simple.
Number six would be SMS, or one-way push notifications, which are not the two way handshake that I was talking about earlier. These are considered less secure because of the SIM swapping vulnerabilities that are prevalent today.
Number seven would be voice call based OTP, similar to SMS, where you confirm the PIN code. The calls are susceptible to interception.
At the bottom of the list is email-based OTP, because email is compromised often. That's why we're having this whole conversation, right?
Up to this point, looked at those legacy pieces which conflict with the unified MFA registration service, and we showed you how to successfully migrate off of that and towards the new methodology. We also covered ways in which you can disable those weaker MFA methods, leaving only the strongest. And, we covered how we at Prescriptive view whichmethods are weak and which are considered strong. Now we'll transition into putting these stronger MFA methods into action.
Part 3: Put Stronger MFA into Action
We've already talked about which registration options will allow our users to add to their identities. Now we're going to talk about what we will allow our users to use in our tenant in order to protect both our users and our data within our tenant.
I heard this somewhere, and it resonated with me, especially now that we work in cloud-based IT environments:
Bad actors aren't breaking into the environment anymore. They're just simply signing in.
Anything we can do to elevate protecting our identities for our users improves our game. Here the magic actually takes place in the conditional access policies. And for those of you that are still using security defaults, you're going to need to move or transition over to conditional access policies in order to take advantage of these capabilities. The great news is that it's free!
It only requires your Azure AD Plan 1, or now called Entra ID Plan 1 (P1) subscription, which most, if not all of you, should be covered for. If you're really running lean, when you're only running Exchange Online, P1 plans wouldn't apply to you. This would be for those users or those tenants that have that bundled service where they have his Entra ID Plan 1.
Before we dive in, I want to give you some words of caution. Number one, I kind of hinted at it before, you must have all of your users registered with MFA. Why? As soon as we put in stronger requirements and actually depend on MFA, unregistered users are going to get locked out. Not only that, moving beyond getting everyone registered, you're going to have additional challenges when you want to up the game in your enforcement. If you start talking about enforcing specific forms of MFA, if you have a user that is registered for MFA but not the proper form, they'll get locked out as well, and in some cases, depending on the MFA method that you want to enforce, not only can you lock your users out, but you have the potential for preventing them from even being able to register for that service, caught in a "locked out loop", so to speak. I'd also call this the "new hire phenomenon", and I've got some solutions. To figure out who has not signed up for MFA, and then for those that have signed up for MFA, which methods they have registered for, it's found in the user registration details under security, and then manage authentication methods. This time go to the monitoring section on the left and click on user registration details, and it'll look like this:

Let's look a little bit closer. This gives you the option to download, put in an Excel so you can do your pivots and figure out who's left out who has what. It calls out the specific registration options that they have added to their identity.

A couple of them I've highlighted here. Even though we turned off some of these weaker forms of MFA, that does not mean that it removes those weaker forms of MFA that have been attached to your user's identity in and in this case, if we, in our example, were only to allow Microsoft authenticator passwordless phone sign in, our user here at the top, Adele, would be locked out because she is only registered for the push notifications. That's why it's important to zero in, get this report and analyze where you're at and where you need to get to before you can start turning up the heat on your authentication methods.
CAs (conditional access policies) are where the magic happens, and the way this happens is through a new mechanism called "authentication strengths". To get there you would go back into that security area under the authentication methods, and there's an option to click on authentication strengths. You'll see a list of authentication strengths, and there are three default profiles included. We'll go through those now and talk about which one is the weakest and which ones are the stronger.
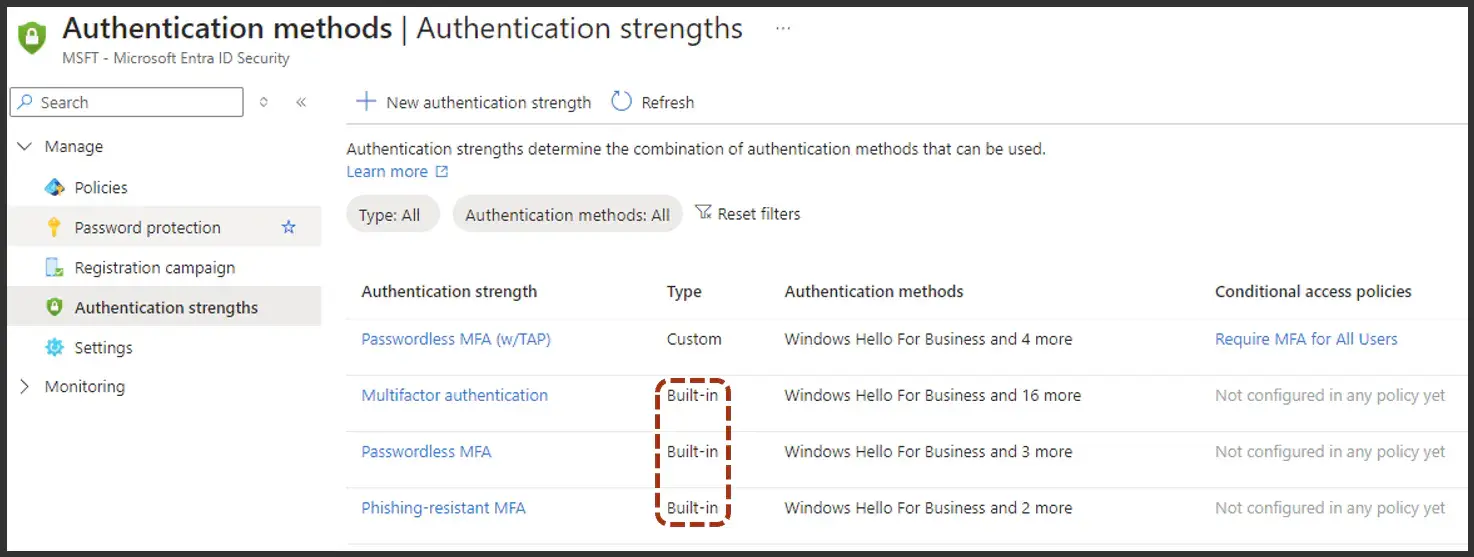
At the bottom of the strength category would be the multifactor authentication profile.
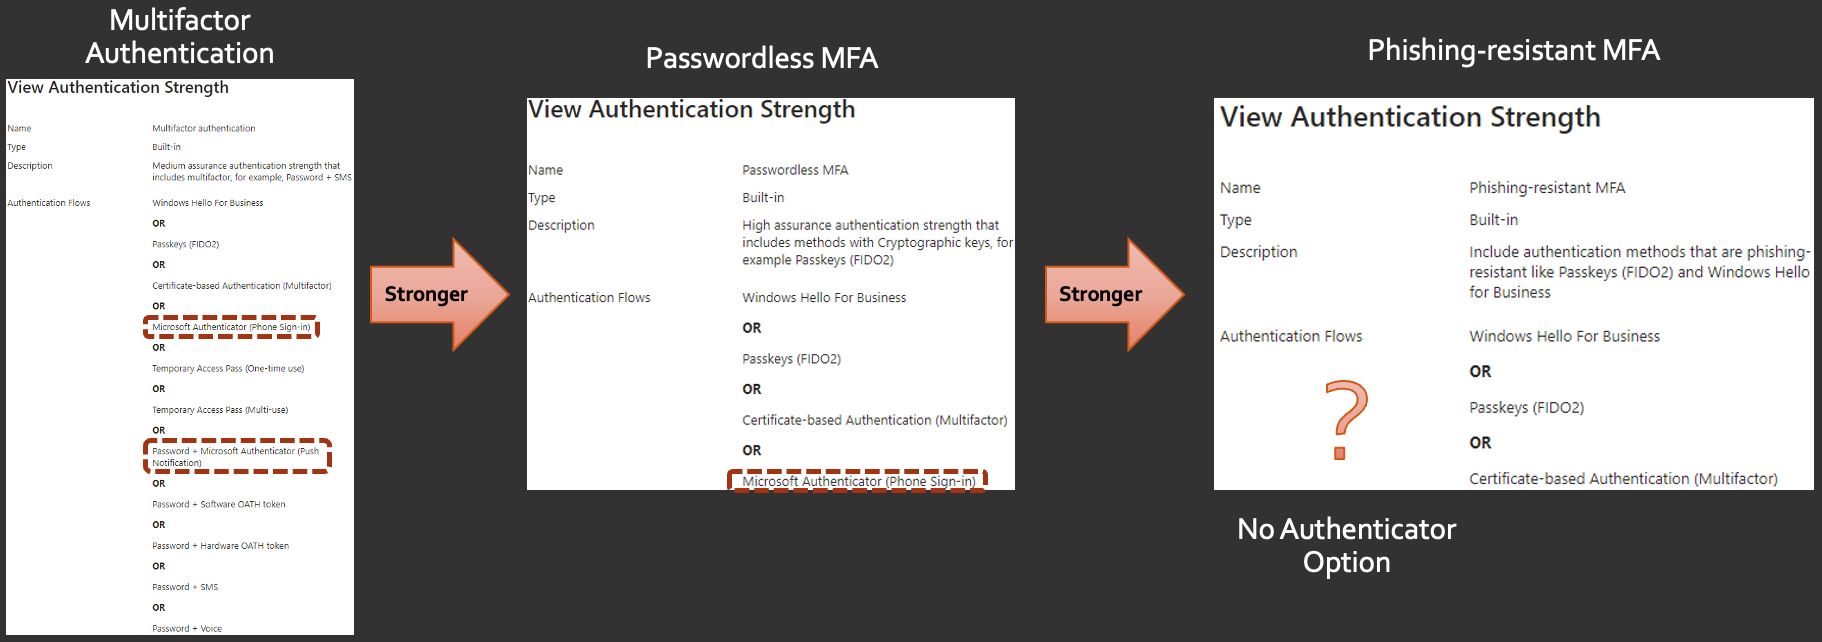
These are the factors that you can allow your users to use. This Multifactor Authentication strength profile allows the most factors to be used. Stronger would be the Passwordless MFA authentication strength, which only allows four methods of authentication. And the strongest would be the Phishing-resistant MFA profile, which only allows three.
Above I highlighted passwordless, plus Microsoft authenticator push notifications and another option for Microsoft authenticator with just phone sign in, and then you'll see the one in the middle. It has Microsoft authenticator. But what's missing on the right, it's so strong that they're not even pointing to their own Microsoft authenticator option. So don't just take that one and run with it.
I'd recommend creating a fourth option, a custom option. In our case, we call this the passwordless MFA with TAP.
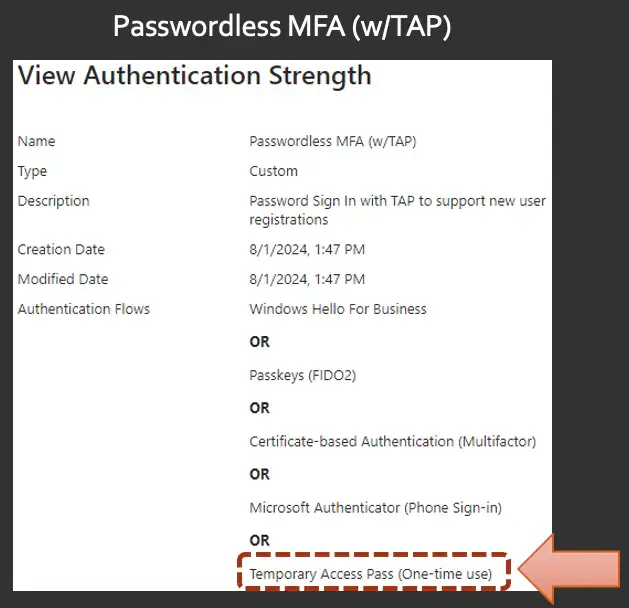
We called it passwordless MFA because we wanted to make sure that our users still had the option to use Microsoft authenticator. And then we added in the temporary access pass (I'll explain why shortly).
How do you actually put them into action? Again, it's in the CA policies, in that "Grant" section that you're familiar with. There's an option to turn off the MFA at the top, and to check "require authentication strength". When you do that, you get a drop down showing all four of those authentication strength profiles that we were just looking at.
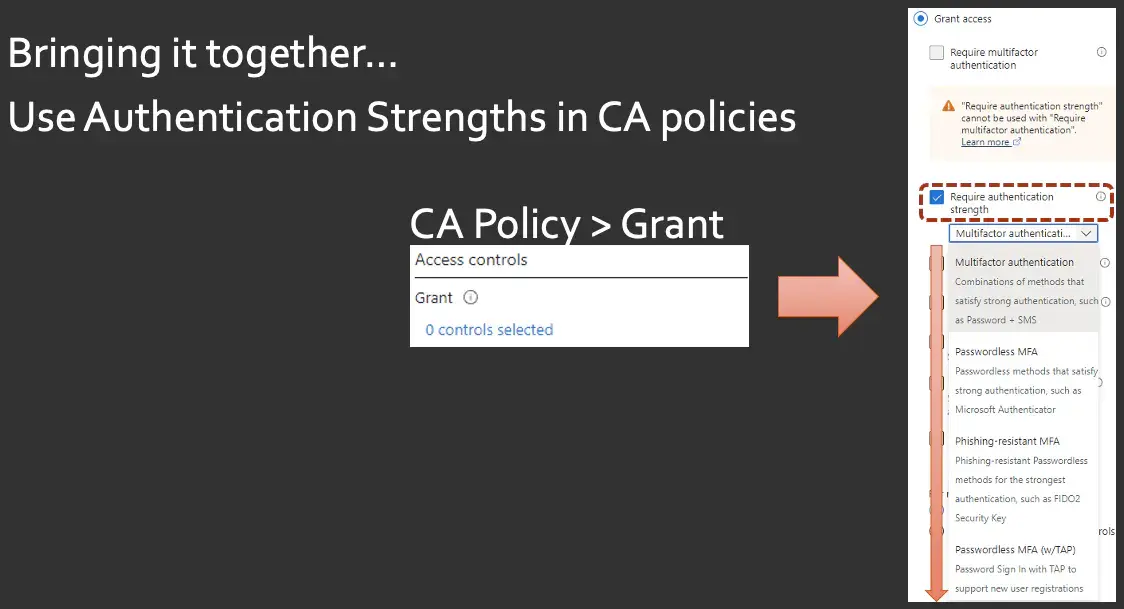
That's how it works. You transition from just carte blanche MFA to "No, I now want to require these specific forms of MFA." Note, there are actually two authentication options, one you've seen listed as a push notification and the other you've seen listed as a phone sign in.
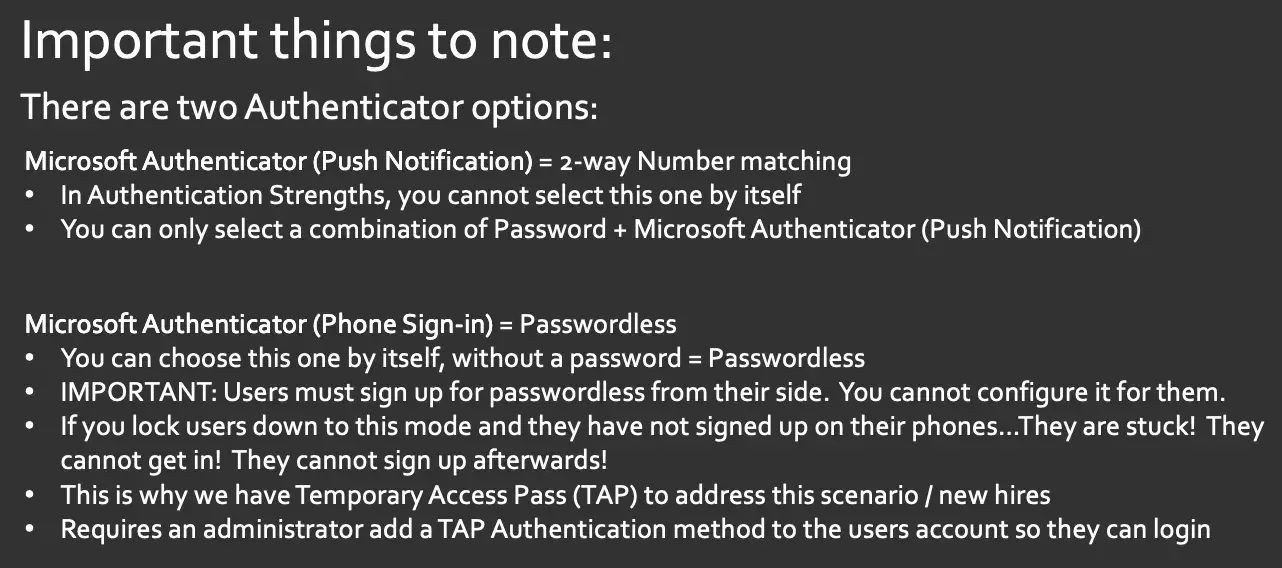
"Push" is that two way number matching and the phone sign in is the passwordless phone sign in option. That is actually Microsoft providing passwordless capabilities for your users. And this explains why when you see push notification and authentication strengths, you can't select it by itself. It's always combined with password. And this is why you can pick the phone sign in option without a password list because or without a password, because it is by definition, passwordless. But don't just pick that. Users actually have to sign up and turn on that option themselves from within their Microsoft authenticator app on their side, they have to go in, pick that work profile and enable it. You can't, as an administrator, configure it for them. That's unfortunate. If you lock those users down to this mode and they haven't signed up on their phones, they're stuck. This is that scenario that I was talking about. If you do this, they can't even register. It's so locked down. But that's where this TAP option comes into play. It's the temporary access pass, and it actually requires an administrator to go in and add that option on that user's account. I'll show you how to do that right now.
Go into the users, pick the user that you want to add that temporary access pass to. For that user, click on their specific authentication methods, and click on the button at the top to add that authentication method.

So I'm here in Adele's user profile. I've clicked on her authentication methods. I just want to click on "Add", and it'll bring up this menu where I can pick "temporary access pass". When I pick that, it gives me a list of options.
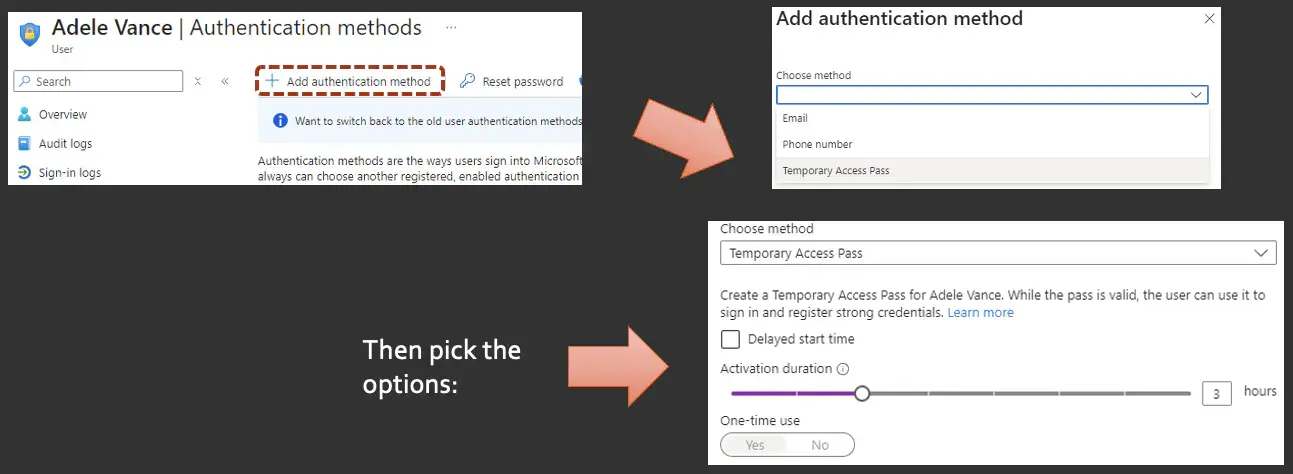
What is selectable here is driven by how you have your tenant configured. And in our case, I believe we had it set for a minimum of one hour, up to eight hours, and I chose three.

In this example, you can delay the start time, and then one time use is set to Yes, and it's grayed out because of those settings. So what this will do, even though they can't register right now, for passwordless this would, this would be that new hire scenario, right? How can they sign up? If they can't sign up, it's broken and they're caught in a loop. Well, this temporary access pass will give them that code to then use the login and get in and register properly. So the TAP settings are found in Entra ID under security, and it's alongside those authentication methods. Where we were picking on the Microsoft authenticator app. And then you would click on its Configure tab once you get inside. And it will show these settings down here. And as I was talking about, ours is set to a minimum range of one to a max of eight, and it defaults to one. And then this is where yes one time is yes and grayed out, and our link is set to eight characters. And what you would do is you would hit this edit button to be able to change these settings.
I hope some of this has been useful. I hope that it's been able to explain the interplay between the legacy authentication methods, the sspr, this new unified approach. I think Microsoft is doing it the right way. I think for a long period of time it seemed to be disjoined. It didn't make a lot of sense, and it wasn't really easy to find information out on the web. But I think I've proven that you can use Microsoft authenticator in a passwordless fashion for free within Azure AD P1.
Act with Caution
Be careful. I know we went fast and hard for all these details, and I've shown you a bunch of big levers, but don't just go in there and start turning these settings on without careful review and waiting carefully in this pool, you can potentially lock yourself out, lock your users out, and make for a very, very bad day. But here at Prescriptive, we're here to help. It's a journey, and I promise you it will greatly secure your tenant, right? The last webinar we talked about was about tackling the default configs and just navigating those pieces. This is truly taking your tenant to the next level and really locking out all the bad actors. Reach out and give us a call.


