Docker Volumes Primer
What problems do volumes solve?
One of the most common barriers to Docker adoption for production deployments is a misconception around data persistence, or lack thereof. While it is true that if you remove a Docker container it’s destroyed and the data is lost but that doesn’t have to be the case. In the early days of Docker one solution was to use bind mounts. Bind mounts mounted an existing Docker host’s directory or file into a container. However, in dynamic environments with multiple applications or versions it can become cumbersome manage. The complexity was greatly increased if multiple hosts used NFS mounts for shared storage. Data persistence for containers using this method just isn’t attractive at scale with critical or revenue generating systems.
Fortunately Docker is used extensively by developers, it’s original use case, and evolving rapidly so those problems didn’t persist for long. Docker volumes to the rescue! Volumes make things much easier allowing Docker commands to do the heavy lifting. Volumes can be created on demand and exist in the Docker area instead of in the host file system space. With the release of the Docker Volume Plugin (DVP) interface in August 2015 with Docker 1.8 the floodgates really opened. Potentially any storage provider or technology could provide a driver for Docker volumes and be controlled with Docker commands. Fast forward just 2 years and many many DVP plugins have been released. Plugins are available for distributed systems like Ceph and Gluster as well as industry juggernauts like Netapp and EMC.
Working with Docker volumes
The easiest way to get started is with local volumes. Further along in the series we’ll explore other DVPs. If you want to follow along please use Docker 17.06-ce or newer. You’ll need Docker 17.06 to use the –mount option for standalone Docker instead of -v. Prior to 17.06 –mount was only used for a Docker Swarm. Since –mount is now universal I’m only going to use that. Let’s get to the fun stuff. To demonstrate let’s confirm there are no volumes then create a few.
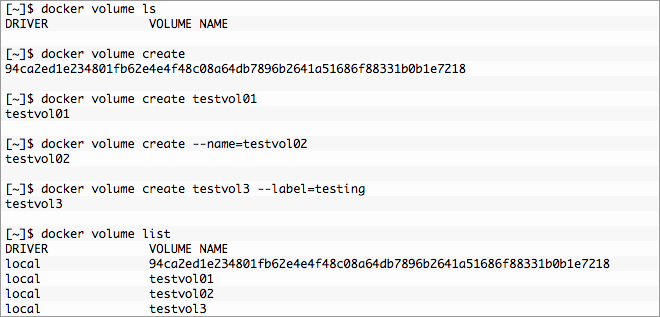
- The first docker volume create command created a volume with no options and a volume name was also created for us or “anonymous volume”. While this is great if used programmatically it sucks for humans who may be doing things interactively or troubleshooting.
- Names are better for humans and the second command gives us just that, a “named volume”.
- The third does the same thing in a more verbose manner that could make it easier for some to read. You’ll almost never see this but it’s an option.
- Last is a variation on the second that adds a label or tag to the volume.
- Finally, list the newly created volumes.
So what happened? To get a better understanding we need to look a little deeper and we do that with docker volume inspect. As you would expect it behaves very much like docker inspect pumping out some nice JSON. Let’s compare the unnamed volume and the named volumes testvol01 and testvol3.
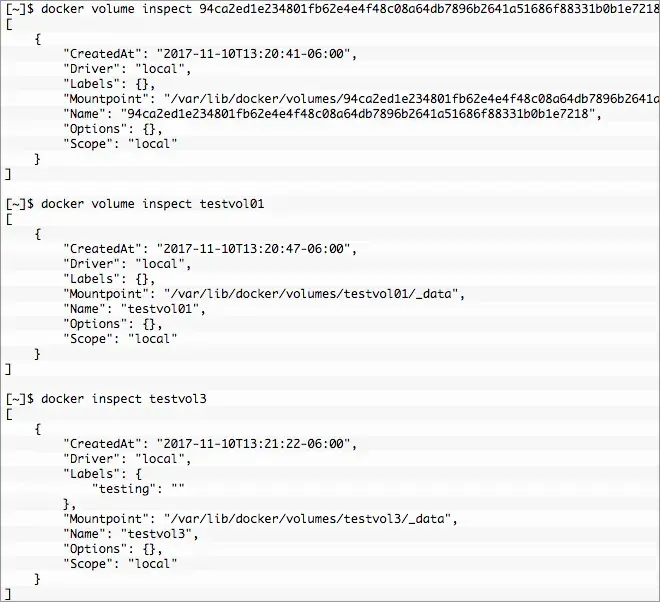
The keys are mostly self explanatory, of the most interest now is Mountpoint. This is actually a directory on the Docker host with the sub-directory _data. This directory was created in the default location. The permissions for /var/lib/docker/volumes/ and the volume directory are restricted to root:root. Docker handles the heavy lifting behind the scenes so the container has access but not everyone in the docker group has access to all volumes. Good or bad root can get in there and muck around, useful info.
A volume on it’s own isn’t very useful so let’s clean up all volumes except testvol01 and mount that volume into a container. To remove a volume we use docker volume remove or docker volume rm either will work. The command accepts multiple so we can hammer them all at once.

Using docker run it’s easy to create a container that mounts testvol01. So let’s create testinst01 and write some data into a container volume mount point. Since the whole point is data persistence we’ll remove the container. The volume and data should hang around. Let’s test it out using Alpine Linux.
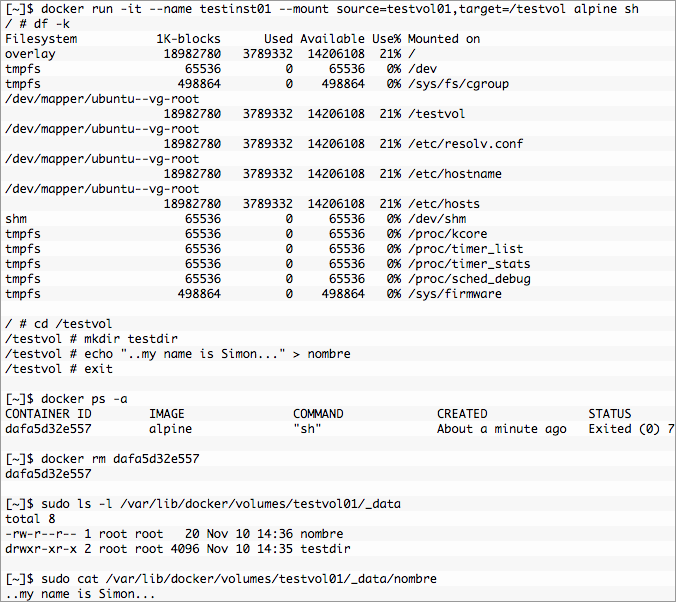
Everything is working as expected, the directory and file are still there and the contents look good. If the container died, was accidentally removed, upgraded, etc another container or containers could be created and mount/remount the volume. Issue the same command to recreate the container and we get a different id but mount the same volume.

One of the huge benefits of using Docker volumes is their creation upon container instantiation. There is no special flag needed, if the “source” doesn’t exist it will be automatically created. Let’s create a new container without an existing volume.

Yep, there it is. A new empty volume named testvol02. Multiple containers can also mount the same volume read-write. To do that create a container with the same volume “source”. It’s also possible to stomp on volume data if you’re not careful, there is no “locking”. Thankfully there is a read-only mount option as well. Handy, no? Nothing special is required to share the mount just create as normal and optionally mount read-only.
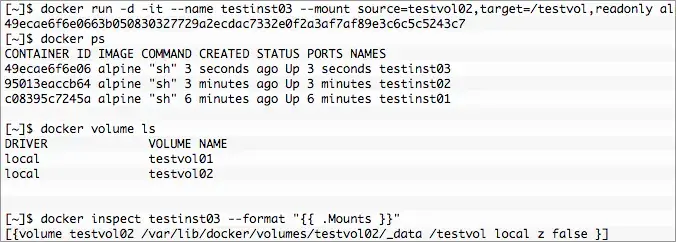
After execution there are now three containers. First testinst01 and testinst02 both with volumes mounted at /testvol from the previous examples. Finally the new container testinst03 with the volume testvol02 that was created with testinst02 mounted at /testvol. However, it’s mounted readonly and any attempt to modify content under /testvol in testinst03 will result in the “Read-only file system” error.
It is possible to mount multiple volumes into a container just like any other system. It’s even possible to mount a volume on a volume, which is useful for building an application directory tree. Take the following structure:

Building a container with that file system structure is accomplished with multiple --mount options. Using the example above as a guide it is very easy to build a container where /app/webapp01/bin is read-only and /app/webapp01/{data,log} are read-write. A single command line will do it.
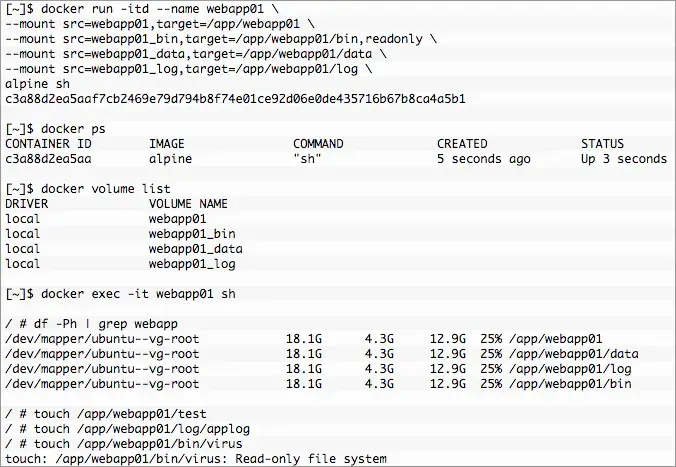
Again, it works as advertised and expected. The base volume at /app/webapp01 is a sort of a “catch all” for the future. It’s not required and any directories necessary for the mount will automatically be created in the container. That mount will not be propagated if mounted on another host. Meaning all 4 would need to be mounted, /app/webapp01 would have the directories but not the contents of data, log or bin unless those are also mounted.
Everything we’ve done up to this point is using the local Docker host overaly2 storage driver. It’s a good foundation and very useful by itself but the more interesting use cases come with plugins. This is especially true when using a Docker Swarm to provide distributed or highly available applications. Coming up next we’ll explore vDVP and vFile for VMware VMFS to create volumes on demand using VMware data stores.


